Battery switch on travel trailer function is crucial for managing your RV’s power. Understanding how to use your battery switch—whether it’s a simple 1-2-both or a more complex setup—is key to avoiding electrical problems and maximizing your camping experience. This guide breaks down everything you need to know about your travel trailer’s battery switch, from its different types and proper operation to troubleshooting common issues and ensuring safe usage.
We’ll cover the various types of switches, providing clear explanations and diagrams to help you understand how they work internally. We’ll then walk you through the proper steps for operating the switch, emphasizing safety precautions to prevent damage or injury. Finally, we’ll delve into troubleshooting, offering solutions to common problems and providing a diagnostic chart to help you pinpoint the cause of any issues.
Battery Switch Types in Travel Trailers
Choosing the right battery switch for your travel trailer is crucial for managing your power sources efficiently and safely. Understanding the different types available will help you select the best option for your needs. This section will explain the common types, their internal workings, and their respective advantages and disadvantages.
Battery Switch Types and Their Internal Workings
Travel trailers commonly use two types of battery switches: the 1-2-Both switch and the 1-2-Off switch. These switches control the flow of power from your trailer batteries (typically a house battery and a starting battery) to various systems in your RV.
1-2-Both Battery Switch
This is the most common type. It allows you to select either battery 1 (typically the house battery), battery 2 (typically the starting battery), or both simultaneously. The internal mechanism uses a rotary selector to connect the appropriate terminals.
| Switch Position | Battery 1 Status | Battery 2 Status | Combined Status |
|---|---|---|---|
| 1 | Connected | Disconnected | Only Battery 1 available |
| 2 | Disconnected | Connected | Only Battery 2 available |
| Both | Connected | Connected | Both Batteries available, potentially in parallel |
Advantages and Disadvantages of the 1-2-Both Switch
Advantages include the flexibility to use either battery independently or both together, which is particularly useful for charging one battery while using the other. This setup allows for separate management of house and engine battery systems.
Disadvantages include the potential for accidental parallel connection of dissimilar batteries (e.g., different chemistries or states of charge), which can lead to damage. Furthermore, the combined position can draw heavily from both batteries, potentially draining them faster than expected.
1-2-Off Battery Switch
This switch operates similarly to the 1-2-Both switch but adds an “Off” position. This “Off” position completely disconnects both batteries from the trailer’s electrical system, preventing accidental drain and improving safety.
| Switch Position | Battery 1 Status | Battery 2 Status | Combined Status |
|---|---|---|---|
| 1 | Connected | Disconnected | Only Battery 1 available |
| 2 | Disconnected | Connected | Only Battery 2 available |
| Off | Disconnected | Disconnected | Both Batteries disconnected |
Advantages and Disadvantages of the 1-2-Off Switch
The main advantage of the 1-2-Off switch is the added safety feature of completely disconnecting both batteries. This prevents parasitic drain from devices or faulty wiring when the trailer is not in use. This also allows for safe maintenance and battery disconnect during storage.
The disadvantage is the lack of the “Both” option, meaning you cannot use both batteries simultaneously. This could limit your available power if you need to run multiple high-drain appliances.
Proper Battery Switch Operation
Operating your travel trailer’s battery switch correctly is crucial for preventing electrical issues and ensuring the longevity of your batteries. A simple mistake can lead to drained batteries or even damage to your trailer’s electrical system. Understanding the switch’s operation and taking precautions is key to a smooth and safe camping experience.
The procedure for operating a travel trailer battery switch is straightforward but requires attention to detail. Always remember to visually confirm the switch’s position before connecting or disconnecting any appliances. Incorrect manipulation can lead to unexpected power surges or complete power loss.
So, you’re prepping for a road trip? Awesome! First things first: make sure your travel trailer’s power is sorted. Understanding the battery switch on travel trailer function is key to avoiding dead batteries and a frustrating trip. Once you’ve got that nailed, it’s time to think about entertainment. For the audiophile on the go, setting up a killer sound system is crucial.
Check out this guide on audiophile travel aetup to ensure your tunes are top-notch wherever you roam.
Step-by-Step Battery Switch Operation
Follow these steps to safely operate your travel trailer’s battery switch. This procedure applies to most common switch types, but always refer to your specific trailer’s manual for detailed instructions.
- Identify the Switch: Locate the battery switch, typically found near the battery or in a designated electrical compartment. It’s usually a simple on/off switch, sometimes with an indicator light.
- Assess the Current Status: Before touching the switch, visually check its position. Is it ON (connected) or OFF (disconnected)? This is paramount to avoid accidental shorts or power surges.
- Turn OFF (Disconnect): If you need to disconnect the batteries, ensure all appliances are turned off and unplugged. Then, firmly turn the switch to the OFF position. This disconnects the batteries from the trailer’s electrical system.
- Turn ON (Connect): To reconnect the batteries, first ensure you have completed all maintenance tasks (if any) and that everything is properly connected. Then, firmly turn the switch to the ON position. You should see the indicator light illuminate (if equipped).
- Verify Power: After turning the switch ON, check that power is restored to your appliances. This simple check confirms that the batteries are connected and functioning correctly.
Flowchart for Battery Switch Operation
The following flowchart visually represents the correct sequence of actions when using the battery switch. This ensures a safe and efficient process, minimizing the risk of electrical problems.
- Start: Check if appliances are off and unplugged.
- Check Switch Position: Is the switch ON or OFF?
- Switch OFF (Disconnect): If ON, turn the switch to OFF. Wait a few seconds.
- Switch ON (Connect): If OFF and you want power, turn the switch to ON.
- Verify Power: Check if appliances have power.
- End:
Importance of Understanding Switch Position
Understanding the switch’s position is absolutely critical before connecting or disconnecting appliances. If the switch is inadvertently left ON while performing maintenance or repairs, you risk serious electrical shock or damage to your equipment. Conversely, leaving the switch OFF when you need power will prevent appliances from working.
For example, attempting to use the refrigerator while the switch is OFF will result in a non-functional appliance. Similarly, working on the electrical system with the switch ON could lead to accidental short circuits and potential injury. Always double-check the switch’s position before any action involving your trailer’s electrical system.
Battery Switch and Electrical System Integration: Battery Switch On Travel Trailer Function
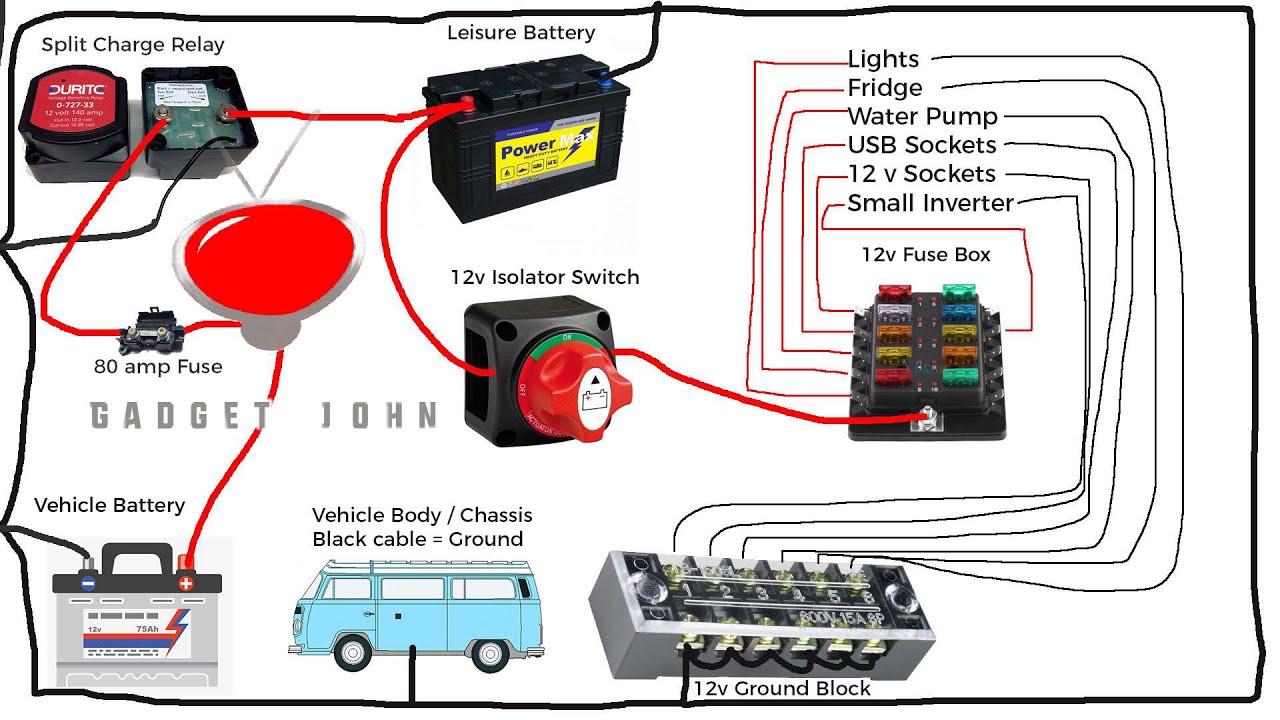
The battery switch isn’t an isolated component in your travel trailer; it’s the central hub for managing power flow. Understanding its interaction with other electrical systems is crucial for safe and efficient RVing. This section details how the battery switch works in conjunction with your converter, inverter, and solar panels, ensuring you can confidently manage your trailer’s power sources.The battery switch acts as a gatekeeper, controlling the flow of power from your batteries to the rest of your RV’s electrical system.
It allows you to isolate the house batteries from the chassis battery, or to completely disconnect both from the trailer’s systems. This is important for preventing accidental discharge of your batteries, protecting your sensitive electronics, and ensuring safety during maintenance or storage.
Connecting and Disconnecting Auxiliary Batteries, Battery switch on travel trailer function
Properly connecting and disconnecting auxiliary batteries is vital to prevent damage to your electrical system and ensure the longevity of your batteries. Before connecting any auxiliary batteries, always ensure the main battery switch is in the OFF position. This prevents accidental short circuits or power surges. When connecting, use appropriately sized wiring and fuses to protect your system. Connect the positive (+) terminals first, then the negative (-) terminals, and always double-check your connections.
So, you’re getting ready for a road trip in your travel trailer? Awesome! First things first, make sure you understand the battery switch on travel trailer function – it’s crucial for managing your power. Once that’s sorted, you can focus on the fun stuff, like setting up your killer sound system. Check out this guide for tips on creating the perfect audiophile travel aetup for those epic sunsets and campfire singalongs.
Proper power management and amazing sound? That’s the recipe for an unforgettable adventure!
Disconnecting should follow the reverse order: negative (-) first, then positive (+). Remember to consult your battery’s and your RV’s manuals for specific instructions and safety precautions.
Travel Trailer Electrical System Diagram
The following table illustrates the typical flow of electricity in a travel trailer electrical system. Understanding this pathway is key to troubleshooting and maintaining your system effectively.
| Component | Function |
|---|---|
| House Batteries | Primary power source for the RV’s 12V systems (lights, water pump, etc.). |
| Chassis Battery | Powers the vehicle’s starting system and essential components (engine, lights). Usually not directly connected to the house systems. |
| Battery Switch | Controls the flow of power from the house and chassis batteries to the rest of the electrical system. Allows for isolation of batteries for maintenance or storage. |
| Converter | Transforms 12V DC power from the batteries into 120V AC power for household appliances. |
| Inverter | Transforms 12V DC power from the batteries into 120V AC power, often for smaller appliances or during off-grid situations. |
| Solar Panels | Generate DC power from sunlight, which can be used to charge the house batteries. Often connected to a charge controller before reaching the batteries. |
| Charge Controller | Regulates the flow of power from the solar panels to the batteries, preventing overcharging and extending battery life. |
| Shore Power Inlet | Connects the RV to an external power source (campground hookup) to charge batteries and power appliances. |
| Distribution Panel | Distributes 120V AC power from the converter or shore power to various outlets and appliances. |
Safety Precautions When Using the Battery Switch

Working with your travel trailer’s electrical system, including the battery switch, requires careful attention to safety. A seemingly simple switch controls significant power, and improper handling can lead to serious consequences. Understanding and following these precautions is crucial for protecting yourself and your equipment.
Incorrect operation of the battery switch can result in several hazards. The most significant risks include short circuits, which can generate intense heat and potentially start a fire. Additionally, accidental contact with live wires while the system is energized can cause severe electrical shocks, leading to injury or even death. Finally, improperly maintained switches can lead to corrosion, weakening connections and increasing the risk of overheating and failure.
Potential Hazards of Incorrect Battery Switch Operation
Improper use of the battery switch presents a range of dangers. A short circuit, caused by accidentally connecting positive and negative terminals directly, creates a pathway for massive current flow. This sudden surge of electricity generates significant heat, potentially melting wires, igniting nearby flammable materials, and resulting in a fire. Furthermore, working on the electrical system while the battery switch is in the “on” position exposes you to the risk of electric shock.
Even seemingly low-voltage systems can deliver a painful and potentially dangerous shock. Finally, a neglected battery switch can become corroded, leading to poor connections and increased resistance. This resistance causes heat buildup, increasing the risk of fire and system failure.
Essential Safety Precautions When Working with the Battery Switch
Before working on your travel trailer’s battery switch or any part of its electrical system, always disconnect the negative battery cable. This single step significantly reduces the risk of accidental short circuits and electric shocks. Always wear appropriate safety glasses to protect your eyes from sparks or flying debris. Never work on the electrical system in wet or damp conditions.
Water can conduct electricity, significantly increasing the risk of electric shock. When using tools, ensure they are properly insulated to prevent accidental contact with live wires. Finally, if you are unsure about any aspect of the process, consult a qualified electrician or RV technician.
Importance of Regular Maintenance and Inspection of the Battery Switch and Related Components
Regular inspection and maintenance of your battery switch and associated components are vital for preventing accidents and ensuring the longevity of your electrical system. Visually inspect the switch and its connections for any signs of corrosion, loose wires, or damage. Clean any corrosion using a wire brush and a battery terminal cleaner. Tighten any loose connections. Check the battery cables for wear and tear; replace any damaged cables.
Consider using dielectric grease on terminals to prevent future corrosion. A proactive maintenance approach can help identify and address potential problems before they escalate into serious safety hazards. Following a regular maintenance schedule, such as once a year or before each extended trip, is recommended.
Mastering your travel trailer’s battery switch is a fundamental skill for any RVer. By understanding its function, operation, and potential problems, you can ensure a smooth and enjoyable camping experience. Remember, safety is paramount—always follow the proper procedures and consult a professional if you encounter any issues you can’t resolve. With a little knowledge and attention to detail, you can confidently manage your trailer’s power and enjoy worry-free adventures.
FAQs
What happens if I leave my battery switch in the “off” position for an extended period?
Leaving the switch off for a long time prevents power from reaching your appliances, but it also allows your batteries to remain disconnected, potentially extending their lifespan.
Can I use a battery switch to charge both batteries simultaneously?
Yes, most battery switches have a “both” position allowing simultaneous charging of both batteries from the shore power or your charging system.
My battery switch is stuck. What should I do?
Try lubricating the switch mechanism with a suitable lubricant. If that doesn’t work, you may need to replace the switch. Consult a professional if you’re unsure.
How often should I inspect my battery switch?
Regularly inspect your battery switch (at least once a year or before each camping trip) for corrosion, loose connections, or any signs of damage.
